
I've made this simple and easy step-by-step procedure on how to apply Mineral Makeup for all the newbies in GT (Girltalk)..Actually, my new friend Che is the one who gave me the idea of doing a tutorial on how to go about MMU especially if you are new and still clueless..so I decided to make this period easier for you guys because I want to help you all just like how many MMU gurus I know who taught and helped me before when I was still new in this MMU bandwagon..so to all the newbies, I hope I can help you with this tutorial and welcome to the beautiful world of Mineral Makeup!
here we go!
you will need the following:
- face products:
(basics) foundation, finishing powder, undereye concealer, blush, lip balm
(extras) primer (for eyes and face), eyeshadows (e/s), glows, mascara, lipstick/gloss
- tools:
1. eyelash curler - this will really open up your beautiful peepers even w/o any mascara..makes a huge difference...I promise that your eyes will look alive with or without any eye makeup.

2. powder brush - a fluffy powder brush is used for applying your primers (if in powder form) and finishing powders..this can also be used for foundation if you only need a light coverage.
3. kabuki/flat top brush - this is used for foundation..you can use either of the two depending on your preference...the flat top brush is denser and has a flat top as the name suggests. This gives a heavier coverage and is perfect for applying thick formulations foundation. While a kabuki is a little fluffy and has dome shaped head and gives medium to full coverage.
4. blush/stippling brush - this is used for foundation, primer, finishing powder, blushes, and glows..can be used for liquid, cream and powder form too..this brush is so multi-purpose that I believe this is a must-have for all makeup enthusiast. But for this tutorial, this is specifically used for applying blushes and glows because it helps give you control in applying your very pigmented MMU blushes.
5. concealer brush - for spot concealing the blemishes that you can't easily covr with just a layer of two of foundation..and also for concealing your dark undereyes.
6. e/s brush - this must be a flat shader brush like the MAC 239 because fluffy e/s brushes doesn't pick-up loose mineral pigments well and it can't also pack the colors on your lids.
7. angled eyeliner brush - I prefer angled brushes for applying my eyeliner coz I have more control with it than with a pointed one..but you can use whatever eyeliner brush you have.
8. swirling bowl - this is a necessity for all MMU users because this is where you will swirl your brush to get the mineral product..i prefer it to be made of glass or porcelain than plastic coz plastic tends to absorb the minerals and you will need to use more products than necessary.
The infamous MMU application technique: SWIRL-TAP-BUFF
1. Put a small amount of product (primer, foundation, finishing powder) on your swirling bowl like this: 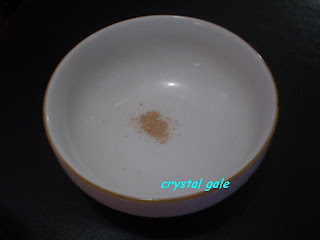
NOTE: use a much lesser amount than this if your foundation formulation is thicker or is a concealer-foundation coz they tend to cake..so build up the coverage you want layer by layer instead of one thick layer..remember that LESS IS MORE is the key.
2. Swirl your brush in your bowl to get all the products in the bristles..it will look like this:NOTE: use a much lesser amount than this if your foundation formulation is thicker or is a concealer-foundation coz they tend to cake..so build up the coverage you want layer by layer instead of one thick layer..remember that LESS IS MORE is the key.

3. Tap off your brush to the rim of the bowl to remove the excess products. Use the excess products for another layer if needed.
 4. After swirling and tapping, your brush will look like this..Then buff away! This is applying your product by doing circular motions all over your face.
NOTE: not all brands of foundation can be buffed..if it has thick consistency like Monave and Pure Anada, you must SWEEP the brush in downward motion instead of buffing coz buffing will make it cake.
Step-by-Step application:
1. Buff a layer of primer (can either be oil controlling, pore minimizing or regular..there are many kinds of primers available) on your face using a fluffy powder brush. Use the same amount of product as shown in the previous picture. Using primer can make your make-up last a lot longer and makes your skin the best blank canvas you can have for your makeup application.
2. The next layer is your foundation. Use your kabuki or flat top brush in applying. follow the swirl-tap-buff technique..Remember to build up your coverage little by little or layer by layer instead of one thick one..this will prevent caking and darkening of your foundation..this is the most common mistake in application coz we tend to put too much product without noticing it.
NOTE: mineral foundation can be applied wet too to make it last a lot longer and to achieve that airbrushed look..to do this, you can do any of the three:
- spritz your brush with a mist (ex. evian mist, bench mist or mac fix+) then swirl it in your bowl to get the product then buff it on your face
- get your foundation from the bowl then spritz the brush then buff
- apply your foundation dry then spritz your face with the mist or use a damp sponge.
3. Apply your finishing powder (can either be oil controlling or illuminizing) using a fluffy powder brush all over your face. Do the swirl-tap-buff too. This can be used for retouching during the day if needed.
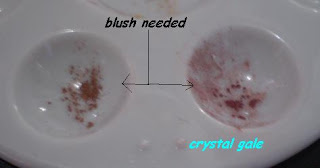
4. Apply your blush. Use a very small amount of blush mineral pigment coz it's very pigmented and it's very easy to get the clown look. To prevent this, use a small amount of pigment (as shown in the picture below..either of the 2 is enough for both cheeks) per layer and build the intensity of color you want little by little.
Smile first (for you to see the apples of your cheeks) then sweep some blush on the apples of your cheeks using circular motion then sweep it toward your lashline..then buff to blend..you can add some glows on top using the same brush if you want some shimmer.
NOTE: you can also apply blushes wet to make it last longer and to make the colors pop. just spritz your brush before buffing it on your cheeks..just use less than the amount shown above coz it will be more pigmented than if you use the pigments dry.
also, if you have over done your blush, don't worry..you can buff it away using your kabuki brush until you have lessened the color on your cheeks.
5. at this point, you can now do your eyes..sweep some of your foundation to your lids and undereye area (using your concealer brush) to cover the discoloration. there are also available MMU undereye concealer to brighten your peepers so you can add that too on top. put a brown eyeliner on your upper lashline (make it as close to the lash line as possible) then curl those lashes.
but if you like to add some color and drama, just remember to use your flat e/s brush to pat the loose e/s pigments on your lid..use little amount only coz MMU pigments are too pigmented and it's very easy to overdone it. and like the blush, you can apply it foiled (just damp your brush before dipping it in the pigment to make a paste)..foling makes the e/s colors pop and longer lasting. Use this amount only or less if possible.
 Then put a coat or two of mascara and eyeliner for some drama.
6. Put a lipbalm/lipstick/gloss on your lips and your done!
**you can spritz your face with mist then let it air dry. this will help also in making your makeup stay put..and if you are oily and don't like the dewy look this technique results in, just brush another layer of finishing power after it dried up and your all set.
All done guys! I hope this helped some of you who are still struggling or needs some help on your application techniques..if you have any more question or comments don't hesitate to leave a comment or send me a message in here or thru my email galebart_15@yahoo.com :)
8 comments:
yey!! i love your tut!!!:) cant wait to read more! mwah!
thanx sis! i'm looking forward to your posts too! =D
How do you like your Charm kabuki?
Nice tutorial btw, really helps newbies. :p
hi sis shasta!
about my Charm Kabuki here's my take :)
PRO: I like the size of the handle and head of the brush..very good for doing the whole face evenly and quickly..it's fluffy so it's even okay for applying finishing powders...plus it dries quickly too so I love washing it since it becomes softer after washing.
CON: sadly, it became very scratchy after a couple of months of using it since I bought it..now, I need to wash it every 3 days just so it can be softer and be used...and it sheds too..there will be pink hairs on my face after using it..
price: 4 out 5
packaging/look: 5 out of 5
quality: 3 out of 5
will i buy it again? I DON'T KNOW yet..but I'll definitely buy if Charm could improve the quality of hairs used in their regular sized brushes (i love love their stippling brush) :)
Thanks for the quick review of the Charm kabuki gale!
Just another question (sorry, kulit), is the Charm stippling brush worth it? Di po ba nagshed?
^ no problem sis :)
super sulit ang Charm stippling..actually, i love it more than my Lumiere stippling..right size kasi..can be used for foundies, fp and blushes..unlike sa lumiere na for blushes lang kasi ang liit hehe..it did shed a few hairs after a couple of washing pero i think it's normal lang :)
hi sis! =) i had this linked in my fb page. i hope you don't mind. let me know if you have any concerns. thanks much. =)
Hi Rosey! No problem. Thanks for informing me :)
Post a Comment