Hi guys! I got an urge yesterday morning to do a makeup tutorial (maybe due to too much watching of youtube makeup gurus) hehe. Well, I decided to try it just to check if I can or can't do it. So please comment so I can hear some feedbacks ^_^
*WARNING: picture heavy*
Okay, let's start! We are aiming for a wearable "eye candy" look. This is fun and colorful but you can still wear it in school or in work coz I tried to make it subdued for a daytime look. Hope you'll like it :)
Here's the look we're going to do:
 Let's start with the base. I used Innisfree Trouble Care all over my face. I applied it using my finger tips. Don't forget to conceal the areas that needs to be concealed so that we can achieve a flawless canvass.
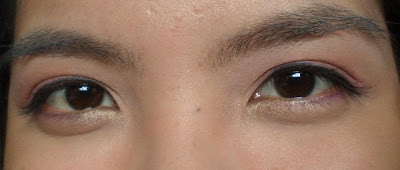
 Now, let's do the eyes. Apply your eyeshadow base of choice to help your shadows adhere to your eyelids and give a better color pay-off. I used MAC paintpot in Painterly.
Apply it using with your ring finger and then dab it until you covered your eyelids (from lashline to browbone. Also apply some base on your lower lashline coz we are going to put some colors there later.

Using your flat shader brush, I use ELF eyeshadow brush, pick up a bright pink shadow. I'm using my Coastal Scents 88 matte palette.
 Apply the pink eyeshadow with dabbing motion all over your lids until crease. It should look like this:
 Get your fluffy blending brush, I'm using my MAC 217 brush, and pick up an orange color. This is the orange beside the pink shade from the CS palette.
 Apply it on the crease, overlapping with the pink, using a wiper motion. Don't forget to blend, blend, blend! You can retouch the pink and the orange until you achieved the intensity of the shade you want. Since I'm going to wear it out, I chose to make it subtle.
 Then using any fluffy brush you have, you can also use your flat shader brush for this, pick up a white eyeshadow for highlighting the browbone. This is the shade on the upper left corner of the palette. It is a matte white.
 Sweep the shadow on your browbone area and blend it with your orange crease color. Blending can help you achieve the flawless transition of the colors. You should not be able to see where each color ends and starts.
 This is how your eyes should look like now.
 Using your contour or pencil brush, I'm using Ellana contour brush, pick up a purple shade. This is the color just below the pink eyeshadow we used for the lids.
 Apply the purple on your lower lashline (3/4 from the outer corner).
 The using the same brush, pick up a golden yellow eyeshadow.
 Apply it on the inner corners of your eyes and blend it.
 Then line your eyes with black eyeliner. Since I don't have any liners, I'm going to use my black eyeshadow for this purpose. I'm going to wet my angled liner brush with a sealant (you can use water too) and make a paste using my black eyeshadow. Then I lined my upper lashline (I also tightlined using the same brush).
 It should look like this:

 Curl your lashes once the eyeliner has dried already. I used my Shiseido eyelash curler for this step.
 Then apply your favorite mascara to help hold the curl of yuor lashes. I used Lancome High Definition mascara in black then removed excess products using a clean spoolie.
 Then if you have any fallouts or mistakes, just use a wet cotton buds to remove them. Once dried, apply a highlighter on your undereyes. I use Ellana Awake concealer and applied it using my Charm concealer brush.
 This also sets your undereye concealer so that it can last longer aside from making your eyes appear more awake.
 And this is our finished eye makeup!
 Now for the face:
I applied my setting powder, I used Aromaleigh URFP in Peaches and Cream, all over my face using a stippling brush (MAC 187) to help control the oiliness and also set my makeup.
Now for the face:
I applied my setting powder, I used Aromaleigh URFP in Peaches and Cream, all over my face using a stippling brush (MAC 187) to help control the oiliness and also set my makeup.

 Very pretty right? and these are only samples because I know I won't be able to finish them up.
 My favorite blush is from MEOW Cosmetics and the shade is called "Claw Your Way to the Top". Whew! that's a very long name for a shade haha. I love this blush because of many reasons:
 *under natural lighting
 I'm very excited about this contest because I was once a blush addict and I know the feeling whenever a certain shade of blush give our face the final glow it needs :)


 Then apply your blush of choice. I choose a pink one, Lumiere Ditt "O" blush, and applied it using a stippling brush, I used my Lumiere duo fiber powder brush because it has a smaller head than my MAC 187 so it fits my cheeks pretty well. Using a stippling brush also produce a "soft" blushing effect but you can also use your regular blush brush.


 And here's my outfit for today. I wore a long white tank top and blue jeans paired with baby blue flipflops. I also wore a hoodie on top since it's raining.
  Thank you for reading my very long post! Please suggest on what I can do to make my tutorials better. Tell me what you think. Post a comment! I'll be waiting for them :)


 You can use a fluffly brush like MAC 217 in applying this but I prefer using my ring finger coz it's easier hehe :)
 This is my technique regardless of colors I use. I prefer this because it is very simple and easy to follow :)


