Friday, August 29, 2008

Emu oil and Organics


I love love Emu Oil...it has so many uses and very effective..it's very widely used medically for its ability to penetrate many layers of the skin..I have tried it in different formulations and here are my reviews :)

1. Pure Emu Oil - I like how it moisturizes and that it really absorbs in the skin..but I'm not fond of the greasy feel I get sometimes..but nevertheless, I didn't break out and it didn't gave me blackheads too...but since this is so expensive here in the Philippines, I asked my Ninong Marvin (he lives in Australia) to get me a tube since Emu birds do originate in their place. But he wasn't able to get me a pure one, instead he got me an Emu Oil in cream form..and I love it better! Thanx ninong!

2. Emu Oil Cream - I know that this is not pure and that this has some parabens whatsoever but when I tried it on my face and skin it feels great..it's very moisturizing, easily absorbed (much faster than the pure one) and super light and no greasy feel and shine...it also makes a very good anti inflammatory and anti itch product for insect bites..really relieves the itchiness and redness fast..Since the original container is quite big, me and my mom and also my titas just transfer a small amount on small (5g) jars to carry with us in case we have some bites or itchiness or if we feel some dryness during the day...love love love this one! I hope the next time my ninong comes back here, he will bring me another big one coz mine is almost half full haha..it smells great too!

3. Emu Oil Rub - this is also bought in Australia by my mom's friend..since she also like my Emu Oil Cream, she asked her friend (who went to Australia for a vacation) to buy her an Emu Oil cream then she'll pay for it here in the Philippines but instead of a lotion type emu oil, her friend brought back a specially formulated emu rub for pain..this has some menthol in it too for soothing and cooling effect...this is really a blessing for us coz this product really works for pain...it was proven by my parents who have arthritis..like last time, my dad had some moderate pain on his soulder and back and my mom put different topical pain relief ointments the whole day but nothing works..but when we got home and before they sleep, my mom massaged a little amount of this emu oil rub on my dad's painful areas..and the morning after, my dad commented that his pain was relieved last night that's why he slept good..so this is very effective..the only con is that it's quite pricey coz this small container cost around $15 (australian)...but you only need to use a small amount every use so this will last a long time for sure.
VENUS and MARS Organic Emu Oil Products


The first time I saw their website http://venusandmars08.multiply.com I already knew that I will be buying their products because of my love for Emu Oil but they have something that made me decide to try it ASAP..all their products are organic..Lately, I'm trying to divert and change all my skincare and haircare to organic products or even natural if organic is not possible..I've read reviews on organic stuffs on girltalk and I was convinced to give it a try coz it might be the solution to my uber sensitive skin that always breakout with commercialized products..I already am using Mineral Makeup for more than 2 years so why not do the same healthier option for my skin and hair right? so it's really a "no-brainer" as I told myself hehe..when I told my mom I want to get some skincare stuff she shouldered it..Thanx mom! She really is supportive on my skin care (she even bought me Jason's Moisturizing shampoo..organic too... it's a very nice product coz I stopped having breakouts on my forehead after a week of using it)..so what I got from Venus & Mars is the Get It Started Kit so that I would be able to try all 3 soap variants and the lotion for a very affordable price of P370..and I tell you, I was expecting a small size of everything but when I got the package I told myself that this would last me for 1-2 months for the soap and maybe 2 weeks for the lotion if I use them everyday...the packaging is simple too and this made me think that they really put a lot of budget for the quality of the product instead of the packaging :)

Here's what I got yesterday...Jamie (owner of Venus and Mars) is so sweet and thoughtful..she gave me a sample of the minty geranium mud soap (I told her I want to give my bf a sample of this soap coz it might be good for his shaving..he has very sensitive skin too) and a note on the receipt...aww, this is the first time ever that I got a sweet simple note from a seller..so thanx Jamie! I really appreciate it so much :)
Coffee Fame - this is the emu soap specifically made to help people who have pimple problem or those who want to detoxify their skin..I tried it once last night and it smells good(though it doesn't smell like coffee even with the coffee beans on the soap hehe)..it didn't made my skin dry and I did not have the tight felling that I got everytime I wash my face with my Aveeno Clear Complexion Cleansing Bar...No itchiness or breakout so far but I'm still reserving my judgment..I'll definitely post a review again after 2 weeks or 1 month..but my initial reaction was "This is good" :D
Minty Geranium Mud - this is compatible for us who shave..according to the description, it will make your shaving area smooth and fair (it has papain) plus it also has antibacterial properties that will lessen the irritation if we nick our selves during the shaving...this can also be used as a regular bath soap...and I will definitely use this everyday coz I love the smell and this can replace my whitening soap too..Isn't it a great product? shaving cream, whitening, antibacterial, moisturizing and smoothening all in one? will definitely get a regular sized bar when I finished my sample up :)


Poppy Plush - this is made for those people who have very very sensitive skin...I gave this to my sister who has skin asthma so I don't have any review for this..will ask my sister for a review after she used it for at least a week to check for any reactions to the product :)

Emu Lotion (melon scent) - I don't have an individual picture..it's the small white bottle with the receipt...gosh, this product is heaven haha...relaxing scent and very moisturizing..at first when I tried it I thought it's sticky coz it's very thick in consistency but after a few seconds and it was already absorbed by my skin, I was convinced to get a full size too haha..the scent lasted for a couple of hours too so it's a plus..this emu lotion has 2 variations..I got the melon one for the added whitening effect coz I want to make my skin a little brighter (I'm naturally fair).

Lip Detox - this is my wish list...according to their website, this lipbalm doesn't contain any petroleum based ingredients and this will relieve dry and chapped lips..that's my problem eversince..since I get easily dehydrated, my lips are always dry..and whenever I put lippies (lipstick, lipgloss and even lipbalm) on my lips, my lips will peel and will look like i have a dried saliva on my lips eek!...I hope this can product can help me :)

so there! you can check out their website for more information on their products at http://venusandmars08.multiply.com or you can click the link on my "link list" on the right side of your screen..I'm not selling their product..I'm just a VERY SATISFIED CUSTOMER of Venus and Mars..good quality product and outstanding customer service :)

Wednesday, August 27, 2008

Dreamworld + Dayna's FOTD

Me and my bf went to our school this morning to request for a re-copy of our TOR and Summary of RLE which we will be needing for applying jobs in the near future..but sadly, we're not able to request for it because the line in the cashier was too long..we didn't know it's exam week so tuition payment week..so we decided to just come back :)

before going home, we ate lunch at A Venetto Pizzeria at Trinoma..we had Putanesca and hawaiian pizza w/ extra cheese..yummy yummy! this is our fave Italian resto coz the foods are great and affordable :)

here's my FOTD today..I used my Dreamworld foundation in Luna formula (this is a mix of Freyja and Nimue coz they both don't match me haha that's why I mixed them) ..I really love DW's foundation coz they give a very nice coverage and it has good staying power..but since I have the wrong shades, I can't use them frequently..I'm still in the process of deciding which shades will be perfect to mix with these two shades to make it my match..any suggestions? I would really appreciate it..I need something yellow coz this two really don't have any :D

FACE:
-Dreamworld foundation in Luna formulation (freyja + nimue)
- Dayna's Minerals foundation in G2 - one layer to add some yellow
- Milan Oil at Bay
- Ellana blush in Coral Pink
- Clinique bronzer on top

And here's a shot taken after 7 hours without any retouch or blotting paper ..cool right? I still look fresh even though my makeup is already fading :)

here's a picture of us when he brought me home earlier..we look weird haha :)


thanx for dropping by guys! :)


Sunday, August 24, 2008

Natural FOTD

This morning when I woke up, I feel like doing a very simple and natural look..so after I took a bath and applied all my skin care, I started my makeup with my yellow cream undereye concealer (I forgot the brand..Jamie, what's it again? hehe)...I blend blend blend since any product I put on my undereye area crease so I really need to blend it well and it can't be too thick..then I did my neutral eye makeup using my mom's Christian Dior palette..then on the fun and difficult part of the whole look...covering those blemishes..

I tried Ellana green corrector concealer on the blemishes..they said this color will neutralize the redness so that it would be easier to cover with foundation..I can say it did lessen the appearance of the scars but sad to say, the blemishes are still very much visible even after a layer of foundation..anyways, I'll set that flaw aside since I'm not really good at concealing anything hehe :)

I used the following products:
EYES
- yellow cream concealer topped w/
- Meow undereye concealer in Frisky Chartreux
- MAC PaintPot in Painterly
- MAC e/s in Relaxing
- Christian Dior Palette (beige, dark brown and bronze e/s)
- Clinique Mascara
FACE
- Milan Oil at Bay (as primer)
- Ellana concealer in Innocence (green corrector)
- Lauress Minimalist foundie in Pure Yellow (2 layers)
- Milan Perfect Presentation (as finishing powder)
- Bare Naturals Viva Sofia blush
LIPS
- the Body Shop lip and cheek tint
- Petroleum jelly
- Avon glazewear l/s in Milk Chocolate

Here's my FOTD when we went out to go to church this morning..pardon the hair (again!)..I'm not really good in arranging my hair..I just put it in a ponytail most of the time haha :D

*taken with flash inside the house*
*taken w/ flash outside the house*
*taken w/o flash outside the house*


Does anyone of you experience difference in oil control with Milan OAB and PP primers/finishing powder when used with different brands of foundation? Coz whenever I uses these 2 with Meow and Dayna's, the oil control will last for at least 5 hours before I feel greasy..but if I uses them with Lauress I will feel greasy before 5 hours..weird :/

Saturday, August 23, 2008

Ellana Minerals Haul and Review

I went to Megamall Mega Trade hall 3 earlier with my mom and sis..While my mom is going around the hall to check all the booths, my sis and I went to Ellana Minerals' booth..I've met sis Coney (nice seeing you again sis and thanx for assisting us!) and she taught me and my sis on how to properly apply Ellana products (my sister is the model haha)...This is to prepare my sis in selling the products to their school (she's going to be a re-seller of Ellana..she's a marketing student in FEU and they are required to sell something to raise funds for their institute's organization)...I suggested this brand to my sister because her target customers are of course students and so they have limited budgets...and Ellana is a very affordable brand with good quality products...so it's the perfect brand to sell in a school ground...Actually, the only item I have tried personally from their line are the blushes...and since I already have some previous experience with the blushes, I was more intrigued on cheking out the other products like e/s, lip stuffs and brushes when we stayed in their stall.


My Review:

- blushes: I love the shades of their blushes because they just give your cheeks healthy looking flush and not over the top color..it has subtle sheen so they are perfect for those glows and illuminizers you have in your stash..they are pigmented so that's good..staying power on my oily skin is just so-so..but for the price and effect, I won't mind re-touching when necessary

- Lip products: their lip balms and lip colors are great! very moisturizing and long staying..even if you have wiped it off, there will still be some tint left on your lips...for the price, I will say this is heaven sent already coz they can sell this at a much more because of the quality..love love love it..i have no rants so far

-Eye shadows: the first thing that caught my eye instantly when we arrived at their booth are the beautiful pots of eyeshadows that has gorgeous colors inside...but sadly, when I swatched it on the back of my hand, it hardly showed up..they are not as pigmented as my usual MMU e/s pigments, but for the price, they are okay in staying power...they did stay put on my sister's eyes for almost 5-6 hours without any base and applied dry..and my sis perspired the whole time

- Brushes: this is love...they are so soft especially the buffer brush and baby buki..I will definitely get one for myself..they are as soft as the EDM long handled kabuki that I love so much..I love the size of the buffer brush coz it will be a lot faster to finish the whole face and since all the brushes are made from high quality synthetic bristles, it's a big plus in my vocabulary...this reminds me of Lumiere kabuki..the color of the hairs, the feel and the quality...i don't think it will shed too..I'll definitely post a review once I have got one for me and have used and washed it for at least 10x so wait for that :)

the baby buki is so cute..this one, I already have hehe..it's the right size to fit in any kikay kit..it has the same synthetic bristles as the buffer brush so it's soft and compact...the idea of having a separate tin container for it instead of having a retractable type is ingenious..I actually hate retractable brushes coz 1) they shed a lot, 2) they stink coz the part near the ferrule doesn't dry totally even if you let it dry for a few days and 3) they dry so long!...so i like this baby buki more..I'll post another review if it will shed or not once I have washed and used it for at least 10x


see how small it is? it's the right size for retouching during the day..or you can use it for applying your blush since it will really fit your cheeks :)
here are some pics of my sister's haul from Ellana Minerals..this is half of the first batch of products she will be selling (the other half will be shipped this Tuesday)...I'm really so happy that my sister is re-selling already coz I won't need to pay for shipping anymore if I want to get something from Ellana..I'll just get it from her stocks haha :D


I'll be trying their foundation, finishing powder and concealers coz I like what my sister and her friend looked like after Coney did their makeover using all Ellana Minerals..watch out for my review..Thanx for dropping by! Till next time :)

Meow + Lauress FOTD

I'm falling in love with Meow Foundation in Flawless Feline formulation again..this is because with the help of Meow, i can lighten up the numerous post acne marks that i have (they are all over my cheeks arggrr!)..I don't feel shy anymore when I go out even if I know that they will notice those blemishes I have...because I know that my skin still looks great even though they are there..thanx to Meow FF hehe oh gosh, I'm so loving it..and I'm so glad that even though it's super hot and humid earlier, my face didn't itch! I think my skin has somehow "adapted" to MMU products after I changed my skin care..coz before, a little heat + a little sweat = super itchy face and neck..but now, even if I'm already drenched with sweat, I'm still okay..so yah, I'm very happy :)

here's my FOTD earlier when me and my mom went out to bond...after concealing my marks with Meow FF, I buffed in a layer of Lauress foundation in Minimalist formulation..and it was perfect...my skin is so photogenic with MMU haha..pardon the hair...i haven't fixed it yet :)

*with flash*

*no flash*

*natural lighting*
what about you guys? what's your HG concealer for covering those dark blemishes? please do share them with me so that I could try it too..thanx! :)

Wednesday, August 20, 2008

Mineral Makeup (MMU) 101

We, MMU enthusiasts, know that how we apply our minerals will have a great impact on how our whole look will be in the end...will it be flawless or dreary, airbrushed or cakey, lasting or not, etc..It really is a must to learn how to properly apply those minerals for you to achieve that natural, flawless, beautiful makeup you really want to achieve...for additional info, you might also want to check out the many tutorials posted on forums and youtube.
I've made this simple and easy step-by-step procedure on how to apply Mineral Makeup for all the newbies in GT (Girltalk)..Actually, my new friend Che is the one who gave me the idea of doing a tutorial on how to go about MMU especially if you are new and still clueless..so I decided to make this period easier for you guys because I want to help you all just like how many MMU gurus I know who taught and helped me before when I was still new in this MMU bandwagon..so to all the newbies, I hope I can help you with this tutorial and welcome to the beautiful world of Mineral Makeup!
here we go!

you will need the following:
- face products:
(basics) foundation, finishing powder, undereye concealer, blush, lip balm
(extras) primer (for eyes and face), eyeshadows (e/s), glows, mascara, lipstick/gloss


- tools:


1. eyelash curler - this will really open up your beautiful peepers even w/o any mascara..makes a huge difference...I promise that your eyes will look alive with or without any eye makeup.

2. powder brush - a fluffy powder brush is used for applying your primers (if in powder form) and finishing powders..this can also be used for foundation if you only need a light coverage.

3. kabuki/flat top brush - this is used for foundation..you can use either of the two depending on your preference...the flat top brush is denser and has a flat top as the name suggests. This gives a heavier coverage and is perfect for applying thick formulations foundation. While a kabuki is a little fluffy and has dome shaped head and gives medium to full coverage.

4. blush/stippling brush - this is used for foundation, primer, finishing powder, blushes, and glows..can be used for liquid, cream and powder form too..this brush is so multi-purpose that I believe this is a must-have for all makeup enthusiast. But for this tutorial, this is specifically used for applying blushes and glows because it helps give you control in applying your very pigmented MMU blushes.

5. concealer brush - for spot concealing the blemishes that you can't easily covr with just a layer of two of foundation..and also for concealing your dark undereyes.

6. e/s brush - this must be a flat shader brush like the MAC 239 because fluffy e/s brushes doesn't pick-up loose mineral pigments well and it can't also pack the colors on your lids.

7. angled eyeliner brush - I prefer angled brushes for applying my eyeliner coz I have more control with it than with a pointed one..but you can use whatever eyeliner brush you have.

8. swirling bowl - this is a necessity for all MMU users because this is where you will swirl your brush to get the mineral product..i prefer it to be made of glass or porcelain than plastic coz plastic tends to absorb the minerals and you will need to use more products than necessary.

The infamous MMU application technique: SWIRL-TAP-BUFF
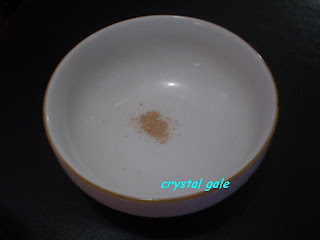
1. Put a small amount of product (primer, foundation, finishing powder) on your swirling bowl like this:
NOTE: use a much lesser amount than this if your foundation formulation is thicker or is a concealer-foundation coz they tend to cake..so build up the coverage you want layer by layer instead of one thick layer..remember that LESS IS MORE is the key.
2. Swirl your brush in your bowl to get all the products in the bristles..it will look like this:

3. Tap off your brush to the rim of the bowl to remove the excess products. Use the excess products for another layer if needed.
4. After swirling and tapping, your brush will look like this..Then buff away! This is applying your product by doing circular motions all over your face.


NOTE: not all brands of foundation can be buffed..if it has thick consistency like Monave and Pure Anada, you must SWEEP the brush in downward motion instead of buffing coz buffing will make it cake.


Step-by-Step application:
1. Buff a layer of primer (can either be oil controlling, pore minimizing or regular..there are many kinds of primers available) on your face using a fluffy powder brush. Use the same amount of product as shown in the previous picture. Using primer can make your make-up last a lot longer and makes your skin the best blank canvas you can have for your makeup application.

2. The next layer is your foundation. Use your kabuki or flat top brush in applying. follow the swirl-tap-buff technique..Remember to build up your coverage little by little or layer by layer instead of one thick one..this will prevent caking and darkening of your foundation..this is the most common mistake in application coz we tend to put too much product without noticing it.
NOTE: mineral foundation can be applied wet too to make it last a lot longer and to achieve that airbrushed look..to do this, you can do any of the three:
- spritz your brush with a mist (ex. evian mist, bench mist or mac fix+) then swirl it in your bowl to get the product then buff it on your face
- get your foundation from the bowl then spritz the brush then buff
- apply your foundation dry then spritz your face with the mist or use a damp sponge.
3. Apply your finishing powder (can either be oil controlling or illuminizing) using a fluffy powder brush all over your face. Do the swirl-tap-buff too. This can be used for retouching during the day if needed.
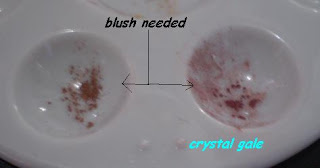
4. Apply your blush. Use a very small amount of blush mineral pigment coz it's very pigmented and it's very easy to get the clown look. To prevent this, use a small amount of pigment (as shown in the picture below..either of the 2 is enough for both cheeks) per layer and build the intensity of color you want little by little.
Smile first (for you to see the apples of your cheeks) then sweep some blush on the apples of your cheeks using circular motion then sweep it toward your lashline..then buff to blend..you can add some glows on top using the same brush if you want some shimmer.

NOTE: you can also apply blushes wet to make it last longer and to make the colors pop. just spritz your brush before buffing it on your cheeks..just use less than the amount shown above coz it will be more pigmented than if you use the pigments dry.

also, if you have over done your blush, don't worry..you can buff it away using your kabuki brush until you have lessened the color on your cheeks.
5. at this point, you can now do your eyes..sweep some of your foundation to your lids and undereye area (using your concealer brush) to cover the discoloration. there are also available MMU undereye concealer to brighten your peepers so you can add that too on top. put a brown eyeliner on your upper lashline (make it as close to the lash line as possible) then curl those lashes.
but if you like to add some color and drama, just remember to use your flat e/s brush to pat the loose e/s pigments on your lid..use little amount only coz MMU pigments are too pigmented and it's very easy to overdone it. and like the blush, you can apply it foiled (just damp your brush before dipping it in the pigment to make a paste)..foling makes the e/s colors pop and longer lasting. Use this amount only or less if possible.
Then put a coat or two of mascara and eyeliner for some drama.

6. Put a lipbalm/lipstick/gloss on your lips and your done!

**you can spritz your face with mist then let it air dry. this will help also in making your makeup stay put..and if you are oily and don't like the dewy look this technique results in, just brush another layer of finishing power after it dried up and your all set.

All done guys! I hope this helped some of you who are still struggling or needs some help on your application techniques..if you have any more question or comments don't hesitate to leave a comment or send me a message in here or thru my email galebart_15@yahoo.com :)